Wednesday, December 21, 2011

Big Things and Small Things

The last couple of months I have really tried to get some things done around my house. Let's just say I wasn't as successful as I had hoped I would be.

 I did dress up my Ikea cabinet.

This white cabinet is designed for shoes, but holds file folders of mail, receipts, school work, and other paper trails created by family members. It works great for a filing system! Originally it came with metal "feet." Not only did I not like how they looked but they also made the cabinet too tall. I added some silver numbers to the drawers. These numbers are from Lowe's and are house address numbers. I went cheap this go round with plastic numbers that I taped up (yes, taped). I wanted to be sure I liked the look before spending fifteen dollars and making nail holes.


I'm waiting for a warm day to paint a frame to hang above the dresser, and to paint that red basket white. It holds junk (i.e my husband's stuff) and sunglasses. The red makes it stand out more than I would like.


My husband painted our pantry door for me. I have hated the etched glass design (a fruit basket) on the door since we moved in. We painted it with magnetic and chalkboard paint.


I like the chalkboard, but not the magnetic paint. The magnetic paint dried very rigid and would not smooth out despite sanding. It gave the glass the texture of wood. But it is better than what it looked like before!


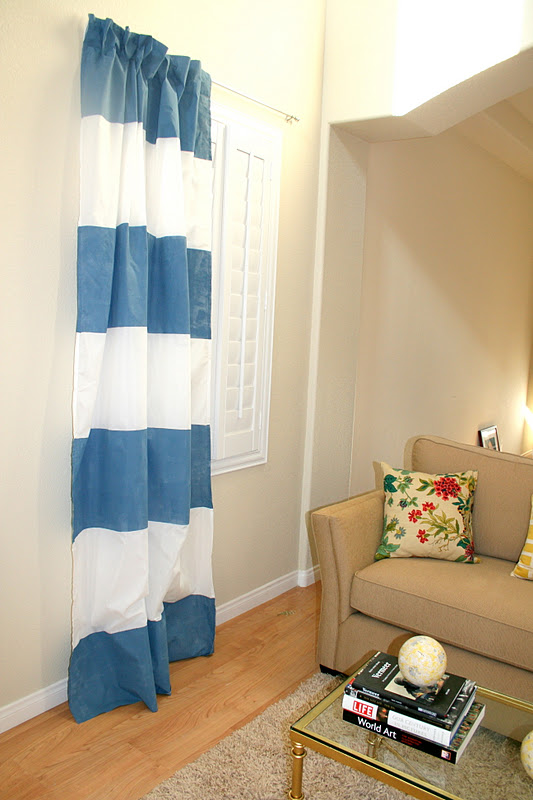
One of the big things I did this Fall was to make my own painted curtain. Here's what I have to say about it: unless the real thing is out of your budget, don't do it! Even using a fabric medium the painted part of the curtain was stiff. I felt like it looked like a cheap version of the real thing. But the funny thing is, I'm not sure that it is cheaper. Because I used a dark paint I had to put on lots of coats. Considering I had six panels to do, the cost of paint would have been almost as much as buying striped fabric, but a whole lot more work.

After doing one panel, I decided to go a different direction. And not just because of the work, but because the look as a whole didn't work with the room.


I decided to bite to bullet and splurge of this fabric:


Duralee Kalah Blue.

 It was pricey at $20 a yard (from fabric.com), but it is so beautiful! It just came in the mail and I am working on getting my curtain panels made.

The other big project I did was to make over chairs for my kitchen. I found these chairs on craigs and really like them. They looked great painted a shiny silver and with new fabric. The only problem? I forgot to prime!! Arghh! So dumb, I know. I'll blame it on pregnancy brain! So needless to say, I'm waiting for the weather to warm up so my husband can strip them for me and I can repaint them.


Here's to a more productive new year!

Wednesday, November 16, 2011

Going Globable

I love globes. Me and everyone else, I know. But they are so charming, and add interest and color to a space. Here is something I never would have considered doing: decoupage.

This butterfly decoupage globe was featured in this month's Tradtional Home Magazine. I kind of love it.


Wouldn't a butterfly one be so pretty in a little girl's room?

Here are some others I found:


Aren't these gorgeous? Really works of art. I'd love to try this some day...if I can bring myself to do it. Maybe once my collection has gotten a little bigger (four and counting) and I have one to spare?

Thursday, October 27, 2011

Table Troubles

The holidays have saved me. I had two "table" tops that were completely stumping me in the way of design and arrangement. I think the main problem was that I was trying to work with what I have. Which, though the most affordable option, isn't always the most workable option. Nothing was working. I was wracking my brains searching the internet for inspiration when October rolled around and I realized I had three months of holiday decor ahead of me...three months to figure out what I wanted to do. Thank you holidays!

My first trouble area is my yet to be hacked Malm. It has a much larger surface area than what was previously there...


...my silver console (that I painted last year in October). Here is what the area looked like then:


And after we inherited some furniture from my in laws:


I don't have any pictures of what was on top of the Malm before October - but it consisted of a vase with branches, a vintage globe and something else. I can't remember!

Currently I'm thinking I might paint the mirror a shiny silver and the malm a teal color - we'll see!

My second area is my entry. That is where my silver console was moved to and currently looks like this:


Before October it looked like this:


Blah! I just don't love the mirror and table finishes together. My ultimate goal is to have a chest of drawers here with a herringbone paint treatment, so I think I'll start looking for the chest come January. My second problem is the whole arrangement. I just don't like anything about it. The red lamp will relocate to my yet to be born baby boy's room (we just found out what we are having last week!), so that gives me a good excuse to scrap the whole table top and start over...other than the fact that it just wasn't working. I'm also planning on painting the inside of the door a midnight blue.

Here is the before, before when we first moved in:


So I have a lot of work ahead of me. Fun work, of course, but work all the same. At least I have a couple of months to figure it out! Any suggestions?

Wednesday, October 19, 2011

The DIY gift

I have a thing about birthdays. Or rather not about birthdays themselves, but about the gifts. I love the decorations, I love the goodies, and getting together with friends, but what I don't love is the gift giving. Mostly when it comes to kids. I had sort of a revelation one year as I watched my daughter eagerly tear into gifts that I knew would only be played with for  a week. But to be polite you accept them with a smile, and then donate them to Goodwill when an appropriate amount of time has passed. I can't be the only one who has noticed this. Kids have too many toys. They receive dozens of toys and play with only three.
There  have been studies that prove this.

So the last couple of years I've decided to start making gifts. Something hand crafted and thoughtful - checking with the mom first to make sure it will be used.

Here are some of the great ideas out there:

Rag dolls

There are dozens of these out there and they are so cute. I made one for my youngest when she turned one and I'm just waiting for some friend to have a little girl so I can make another! You can even get creative make characters out of them. I have a daughter who loves superheroes and I'm thinking of making her a Supergirl version.


via Martha Stewart

There are tons of bag and purse tutorials. This one made me laugh and would be perfect for a book lover.
I'm going to make one to use as our library bag.


via eighteen25.blogspot.com

This is a sweet one and perfect for dads and grandparents - you know the hardest people to shop for. It's a photo book that has pages for the kids to draw or write on. I love it!


Felt is great! It has many uses and is so cheap. I made a felt board for my playroom, a roll-able travel felt board for my daughter's friend's birthday and this felt board for my friend's son.


If you're looking for a way to use scrap fabric and something to keep an older child busy try this:

Braided fabric bracelets.

 I taught my 7 year old how to do this and she spent an hour making bracelets. These would be great for a child who is interested in making their own gifts to give.


You can never go wrong with buttons. I made this for a friend's daughter who was getting her own room for the first time.


These are all over the place and make adorable gifts for babies and children. I made these for a new nephew. With three girls it was fun to do some boy things for a change!

The tie ones are always a hit. Want to personalize it even more? Secretly ask the dad for some of his old ties and use his ties to make the appliques! Now baby really will be just like dad.


Paper crafting is one of the easiest ways to create a gift. How cute is this idea?! Cut shapes and letters out of maps! You could make animals, the person's name, the shape of a state. So many ideas. I made the word LOVE for my bathroom.


I cannot wait to try this. Take an old board book (or one you acquired that has a really poorly written story) paint with chalkboard paint and make a chalk board book! Isn't this a fantastic idea?! Add a box of chalk and it would make the perfect gift for a child.


Hand made hair accessories are all the rage and you can get them any where, but they really do make sweet gifts for little girls. And big girls, too :)


Happy gifting!

Thursday, September 15, 2011

Malm Dresser

Can you tell that I went to Ikea recently? We don't have one here in Las Vegas, so I always make a point to go when I am in the vicinity. This time I made some larger than usual purchases.
I had a spot in my house that was driving me crazy. Seriously, it was giving me a headache I would stare at it so long. I finally came to the conclusion that there was no hope for the hand-me-down pieces that were there and I would just have to get something new and start from scratch.
Enter the Malm. This will be great for filling in the space and adding storage.
What I love most about Ikea pieces is that they are like a blank canvas and can be transformed to your own personal style.
So the question is what direction do I take it?

Knobs:


Greek detailing:


Painted trim:


Nailhead:
(my absolute preference, but it intimidates the heck out of me and I'm not sure that I would ever do it!)


Overlays:
(and easily applied and interesting detail)


The possibilities are endless.

Tuesday, September 6, 2011

Docksta

This is my new kitchen table! While I liked the shape of my octagon one, the paint finish was impossible to keep clean and crumbs got stuck in the cracks. I considered filling it in with wood filler and putting a sealant on the top...but that just sounded like a lot of work :) So instead I bought this:
A couple of weeks ago I bought chairs off of Craig's that look almost exactly like these:


Except they are all black, dirty, and in bad need of some TLC. I love them!
I just need to decide what color to paint the frames. Silver, like above.
White with a fun pop of color for the cushion.


Yellow could be fun.


Leave them black?


Or maybe paint them blue.


Or even red.


What do you think?

Monday, August 1, 2011

Clock Makeover and Alphabet Letters

Out of neccessity I've decided to teach a little preschool this school year. I just couldn't find one for my daughter, but really wanted her to do one. I was looking at my playroom the other day deciding what I needed to get done in there to have it ready for preschool, when I decided that a clock would be good.

Inspiration struck. I took this clock I picked up from my MIL's donation pile:


I removed the hands, coated it in spray adhesive and laid it face down on a map I had tucked away in a drawer.


After smoothing any air bubbles out, I turned it over and with an exacto knife cut around the clock.
(I had a picture of this, but somehow it got deleted and I'm not at home to put the picture back in!)

Once the clock was cut out and the adhesive dry I gave it a light coat of homemade modge podge. You can make your own modge podge by mixing water and glue. Use less water for a thicker, shinier coat and more for a thinner coat.


I made my glue very watery. I didn't want it super shiny, I just wanted to seal the paper and make it a little stiffer to withstand sanding.

Once the modge podge is dry take a light grit sand paper and smooth off any jagged edges. After sanding I added numbers - I don't like to guess the time! I used vinyl numbers that allowed me to easily peel off and reposition the numbers. My MIL gave me the number sheets, but I think they are the kind you use on mailboxes.

And here is the final product:


The pictures aren't the greatest - I get horrible lighting in there :) But I have to say I LOVE how it turned out.
Even better - I used a map from where I grew up. See that lake? I swam there every summer.


Not only do I have a really cute clock, I also have a letter "O" to add to my wall!


I never thought it would take so long to gather letters. Using some things I had in my craft closet I was able to make two more letters.

Some extra fabric and canvas from a long ago art project.


Add a vinyl letter "Y":


More extra fabric, used canvas, and a wood "D":


(I stretched the fabric over the canvas and hot glued it in place. I also hot glued the "D" on.)

Only six more letters to go!